Firmware version: 1.x.x
Last Updated: October 26, 2025
 日本語
日本語
 한국어
한국어
Table of Contents
Product Overview
Introduction
Push-To Air is a compact wireless Digital Setting Circles (DSC) device designed for Dobsonian and alt-azimuth mounts.
Instead of traditional physical encoders, it utilizes a gyroscope and a magnetometer to measure the telescope’s azimuth and altitude in real time.
Built on an ESP32 platform, it supports Wi-Fi and Bluetooth connectivity, ensuring excellent compatibility with SkySafari for easy star tracking and celestial navigation.
Its lightweight design allows for simple installation and removal, making it adaptable to various telescopes.
Push-To Air eliminates the constraints of wired devices, enhancing the freedom and convenience of stargazing.
Product Specifications
| Item | Details |
|---|---|
| Product Name | Push-To Air |
| Model | PT-AIR-001 |
| Supported Mount Types | - Altitude (vertical) & Azimuth (horizontal) Dobsonian, Alt-Az mounts - Not compatible with equatorial mounts |
| Type | Push-To Encoder (Manual Navigation System) |
| Connectivity | Bluetooth (Android only) / Wi-Fi (iOS/Android) * Note: Bluetooth is not supported on Android 12. |
| Power Input | 5V 980mA, 12Wh Li-ion battery (with protection circuit) |
| Battery | 12Wh Li-ion battery (with protection circuit) |
| Charging Method | USB-C (1A), Full charge in 4 hours |
| Operating Time | Over 10 hours (up to 15+ hours in warm environments) |
| Casing & Brackets | - 3D-printed PETG-CF case - Aluminum adjustable mounting bracket |
| Mounting Options | Finder dovetail bracket, magnetic mount, strap mount, double-sided tape, etc. |
| Sensor Accuracy | - Altitude (Vertical) Accuracy: ±0.2° (dynamic), ±0.1° (static) - Azimuth (Horizontal) Accuracy: ±1.0° - Resolution: 8192 steps for both altitude and azimuth (simulated) - Note: Does not guarantee precision comparable to physical encoders |
| Dimensions | 56mm × 76mm × 63mm |
| Weight | 190g (including standard dovetail bracket) |
| OTA Firmware Updates | Supports Over-The-Air (OTA) updates via web browser and Wi-Fi |
System Requirements
Compatible with SkySafari 6 Plus/Pro & 7 Plus/Pro (Paid versions required for Push-To functionality).
⚠️ Note: There have been reports of Bluetooth not working properly with older versions of SkySafari 6 Plus/Pro on Android. Since SkySafari 6 Plus/Plus has been removed from the Play Store, it's no longer possible to download an updated version that may fix the issue. If you're experiencing this problem, please try connecting via Wi-Fi instead, or consider using SkySafari 7 Plus/Pro, which is actively supported.
Package Contents
- Push-To Air unit (with a built-in magnet in the finder dovetail bracket)
- USB-C charging cable
- Adjustable mounting bracket for Dobsonian telescopes (supports 4mm–25mm range)
- Strap/Band bracket for mounting on refractors & compound telescopes (40mm width, 4mm thickness)
- Double-sided tape mounting bracket
- 5-piece mini hex wrench set (1.5mm, 2mm, 2.5mm, 3mm, 4mm)
- Protective TPU Cover (blocks LED light for dark adaptation)
- Carrying pouch
Operation

POWER: Turns ON when the power switch is activated and a valid power source is supplied.
CHARGE: ON while charging, OFF when fully charged.
STATUS: ON during normal operation, OFF if an error occurs.
Push-To Air has a built-in rechargeable lithium-ion battery.
Lithium-ion batteries can explode or cause fire if misused or defective.
Please carefully read and follow the safety guidelines below:
- Do not expose Push-To Air to extreme temperatures, including both high and low temperatures.
- Do not leave Push-To Air in direct sunlight or inside enclosed spaces like a car, where it can overheat quickly.
- Do not drop or apply strong impact to Push-To Air.
How to Use Push-To Air
Powering ON and Preparation
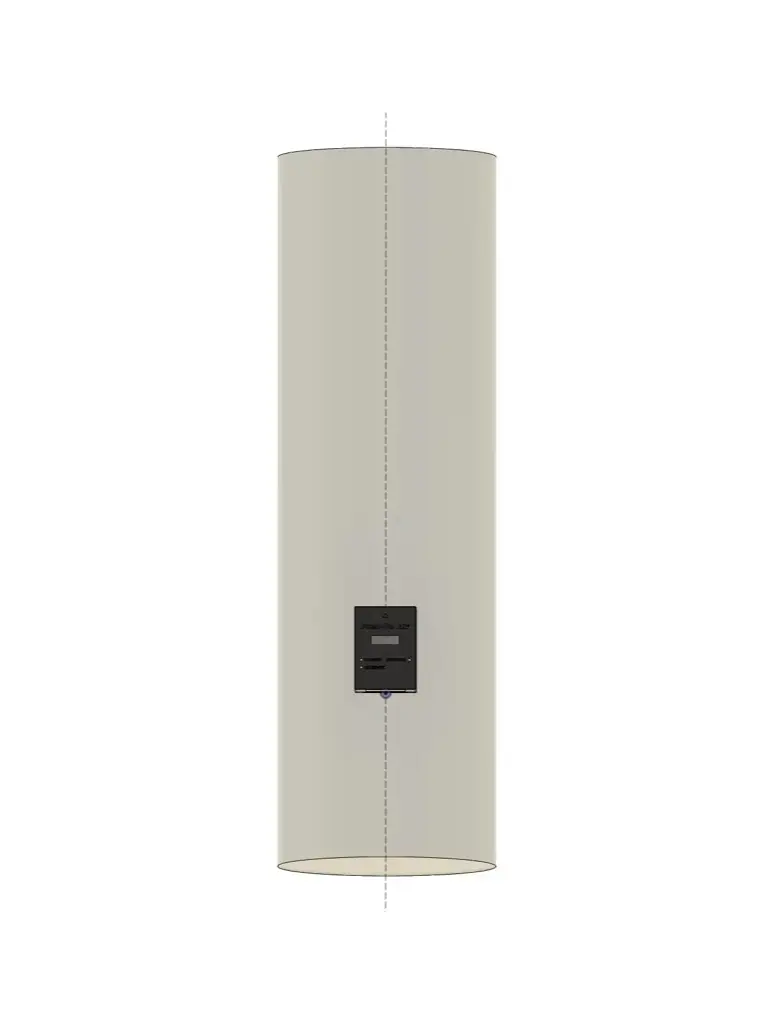
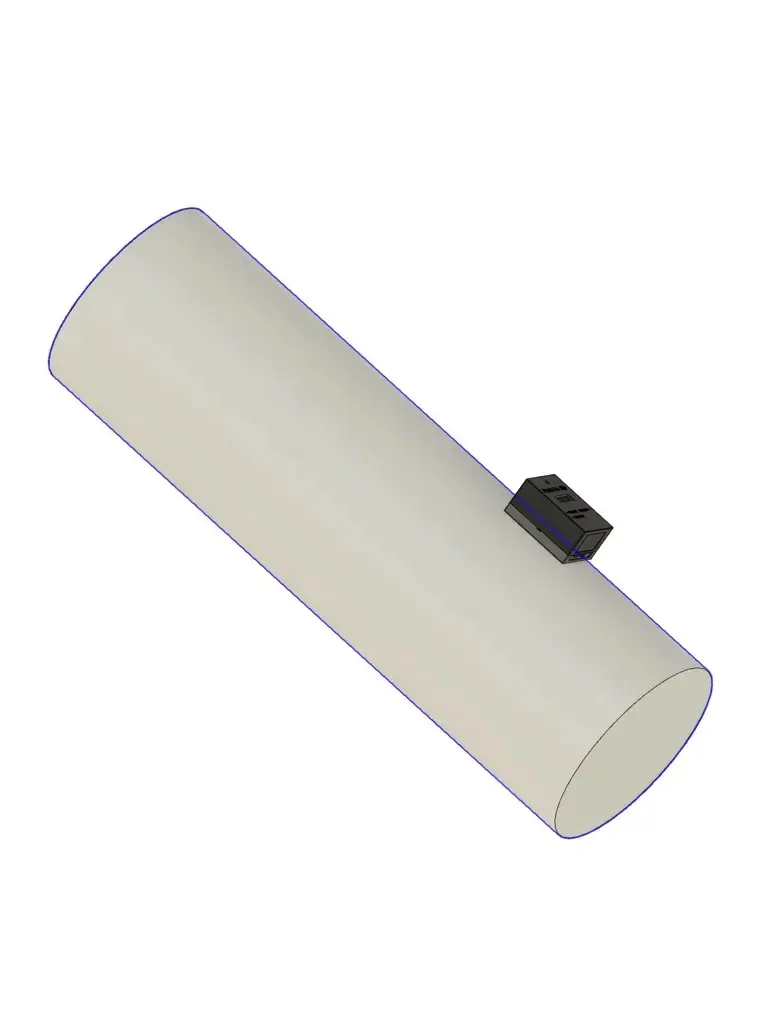
Mounting Push-To Air Horizontally
Attach Push-To Air horizontally in the middle of the telescope using a bubble level.
The closer it is to being level and centered on the rotation axis, the better the accuracy.
However, since it is not a perfect encoder system, approximate leveling where the bubble is near the center is sufficient.
Connection Preparation
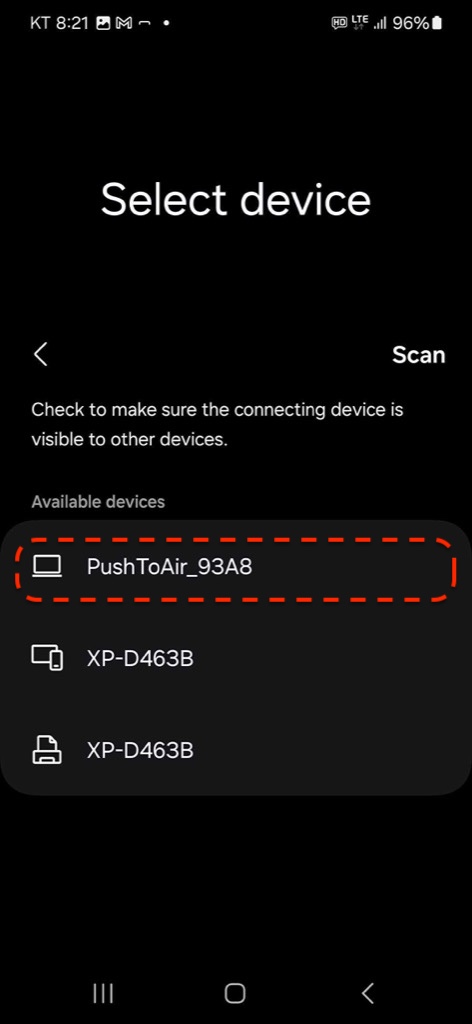
- Turn on the switch, and PushToAir_XXXX should appear in available Bluetooth devices or Wi-Fi networks.
- Choose either Bluetooth or Wi-Fi connection.
Bluetooth Connection
- Bluetooth must be connected through SkySafari. Please refer to the setup instructions below.
- ℹ️ Bluetooth is supported only on Android. Not compatible with Android 12.
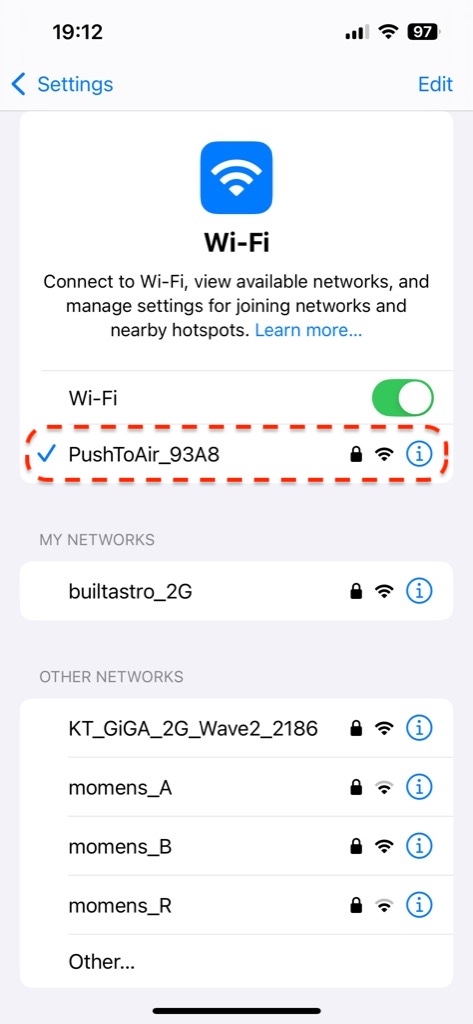
Wi-Fi Connection
- Wireless Network Name (SSID): PushToAir_XXXX
- Password: pushtoair
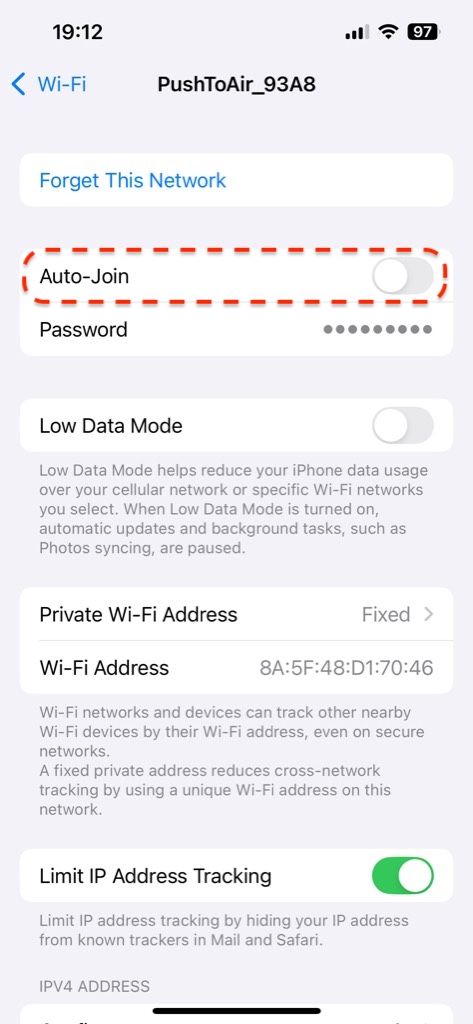
- ℹ️ After connecting, disable Auo-Join to the wireless network.
SkySafari Setup Guide
⚠️ Push-To functionality is only available in the paid versions of SkySafari 6 Plus/Pro and 7 Plus/Pro (separate purchase required).
Telescope Preset and Connection
Adding and Configuring a Telescope Preset
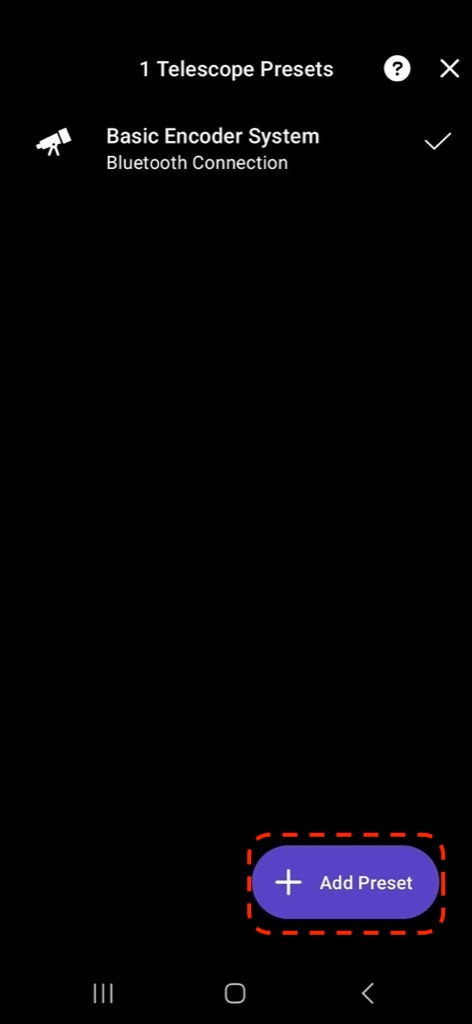
- Add or configure the telescope you want to connect to.
- Multiple telescope presets can be added, allowing you to switch between different telescopes.
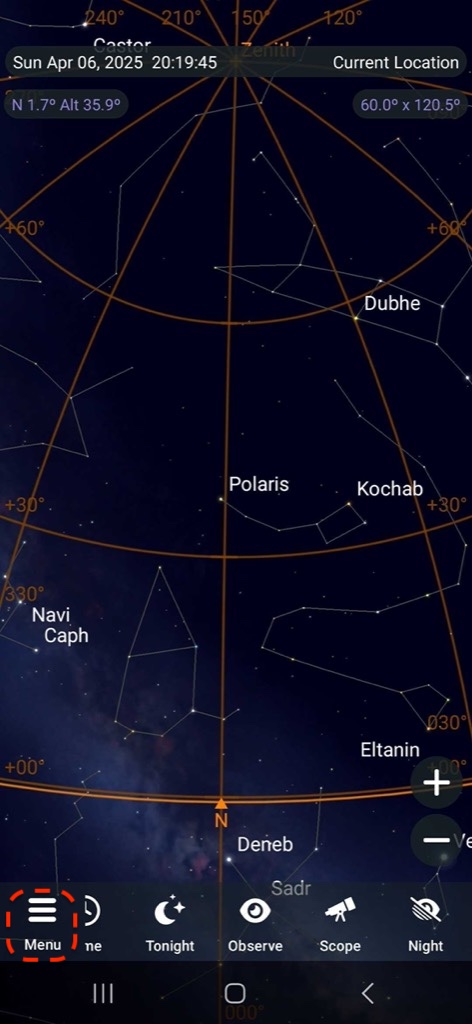
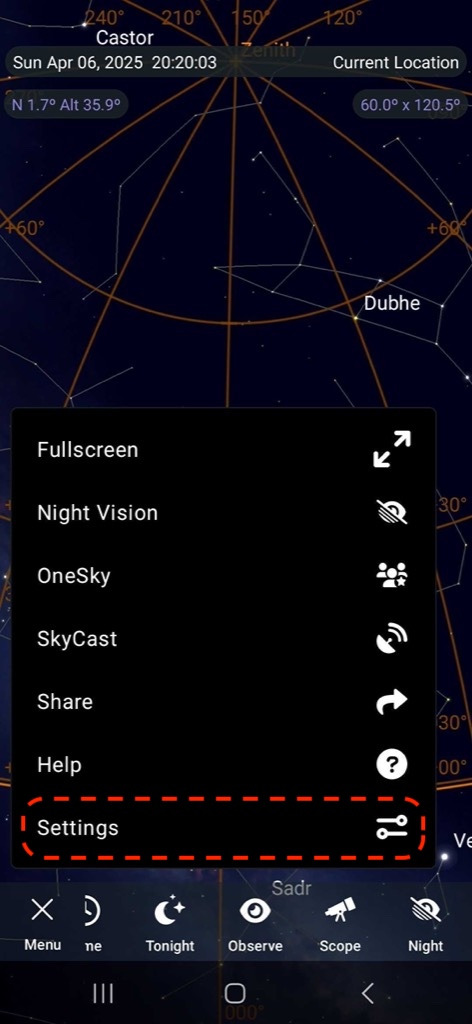
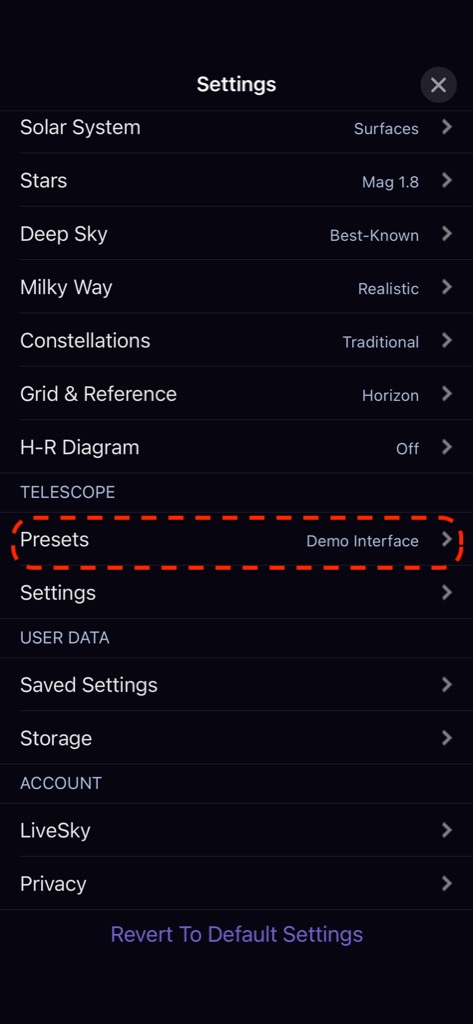
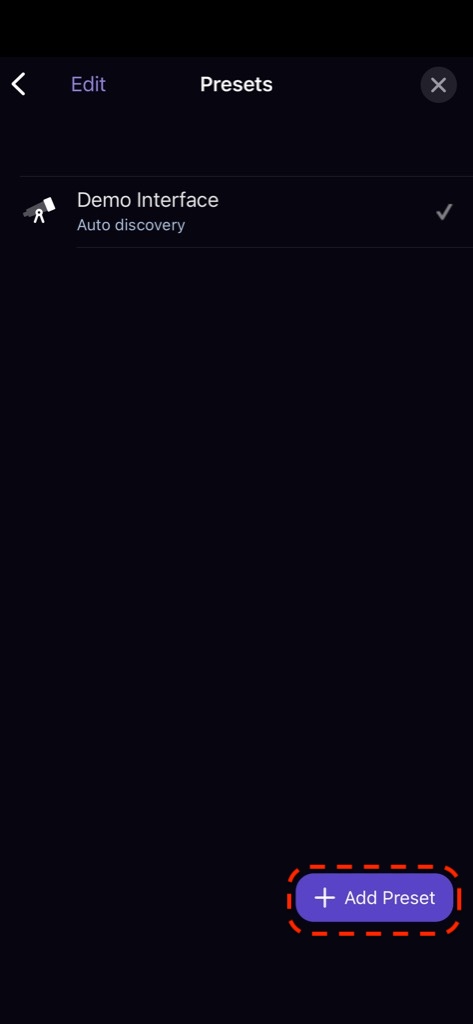
- To add a preset: SkySafari ⇒ Menu ⇒ Settings ⇒ Telescope (Preset) ⇒ Add New
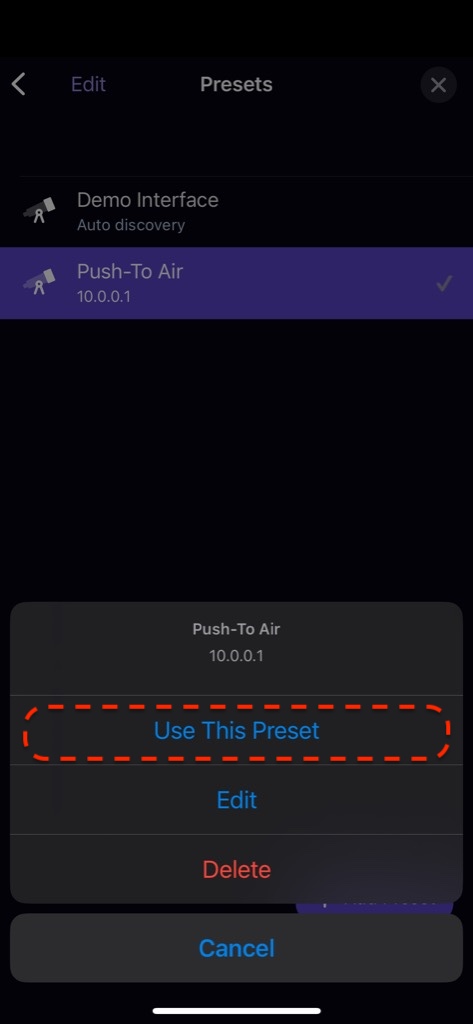
Connecting to a Telescope
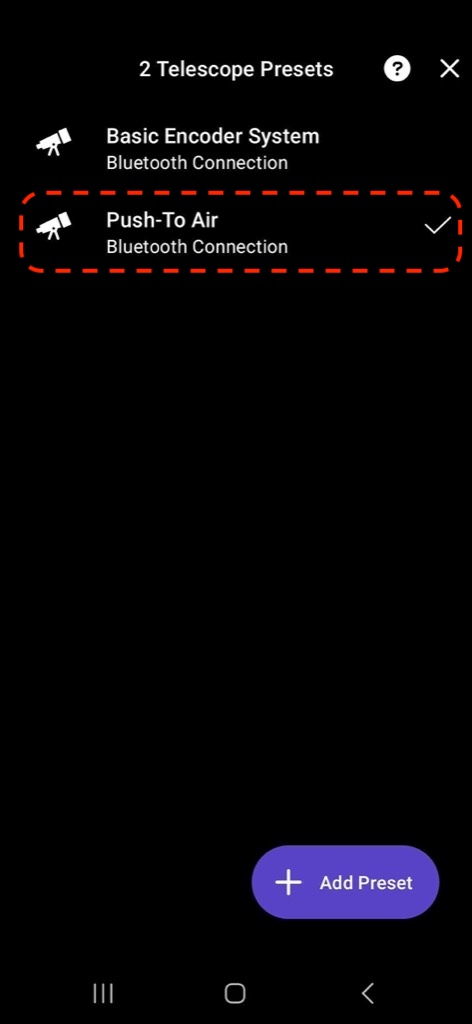
- Select the telescope from the preset list and connect to it.
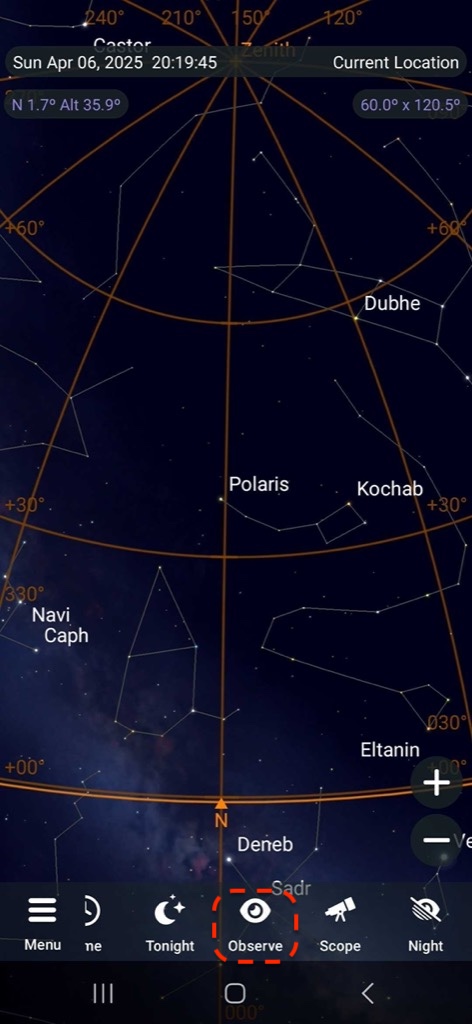
- To connect: Tap the “Telescope” option in the bottom menu bar on the main screen.
Enabling Telescope Display
- SkySafari ⇒ Bottom Menu ⇒ Observe ⇒ Scope Display ⇒ Enable Telrad Circles


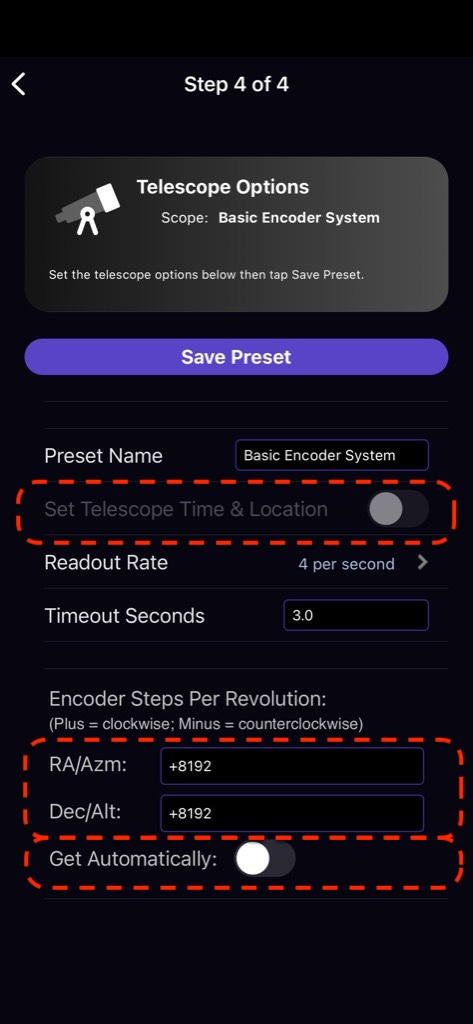
Recommended Telescope Preset Settings
Set up the following parameters in your telescope preset:
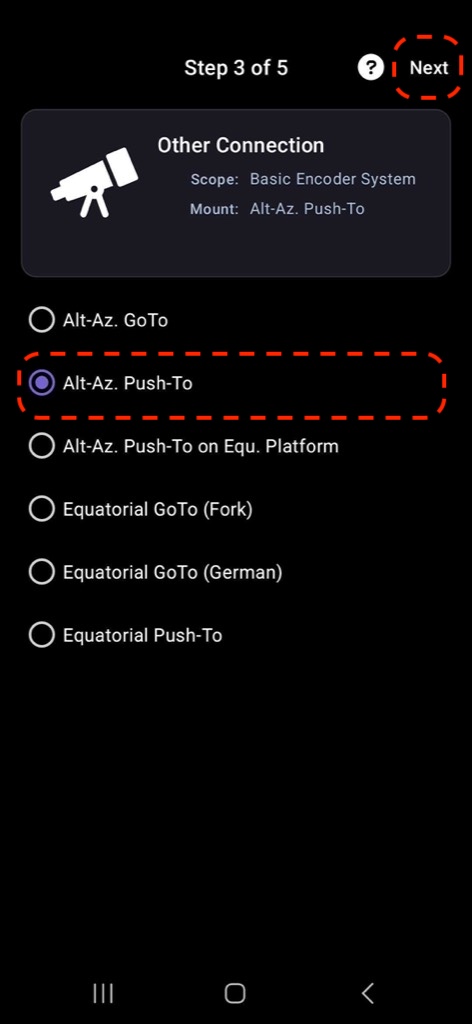
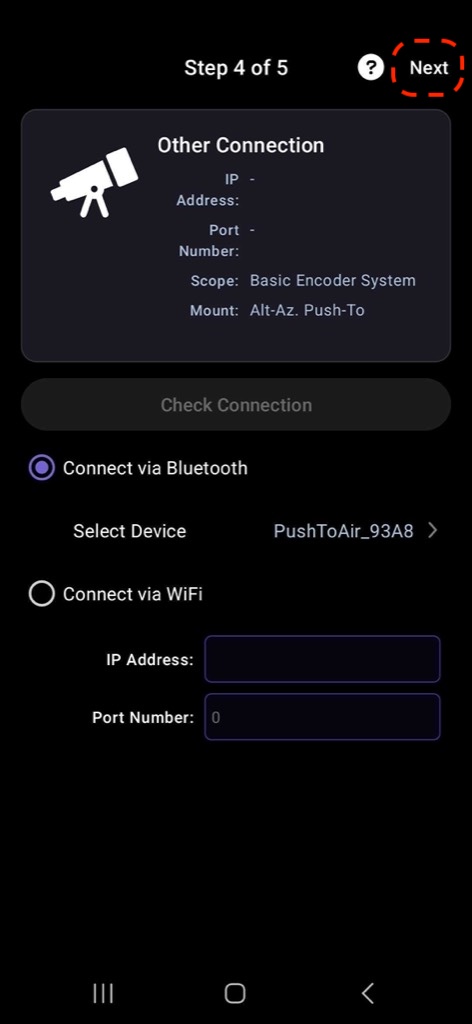
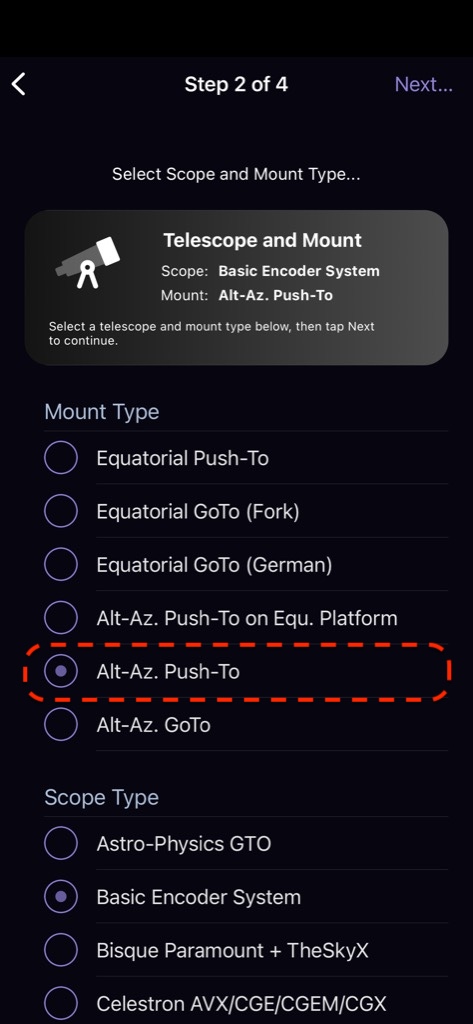
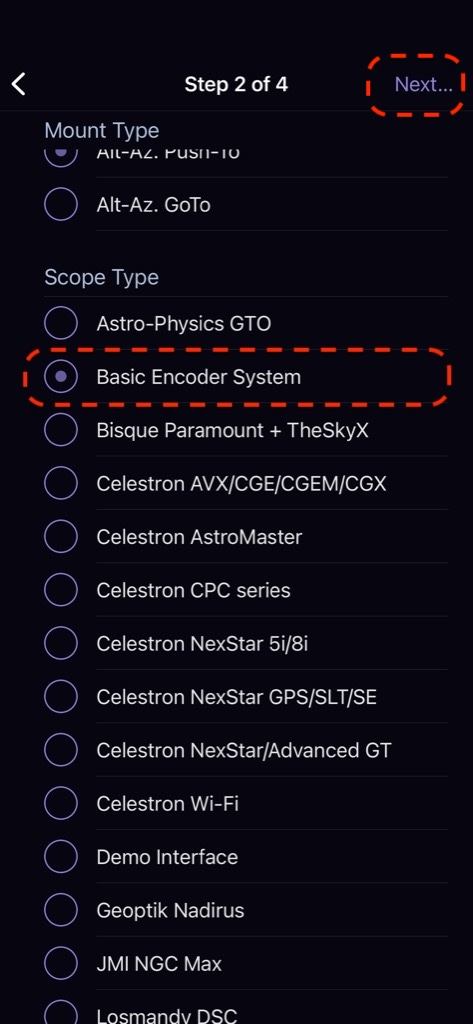
- Mount Type: Alt-Az, Push-To
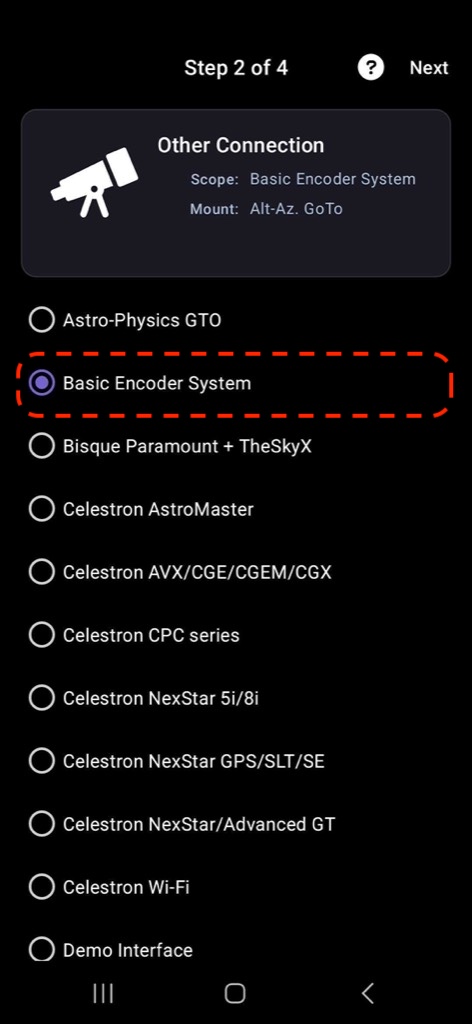
- Scope Type: Basic Encoder System
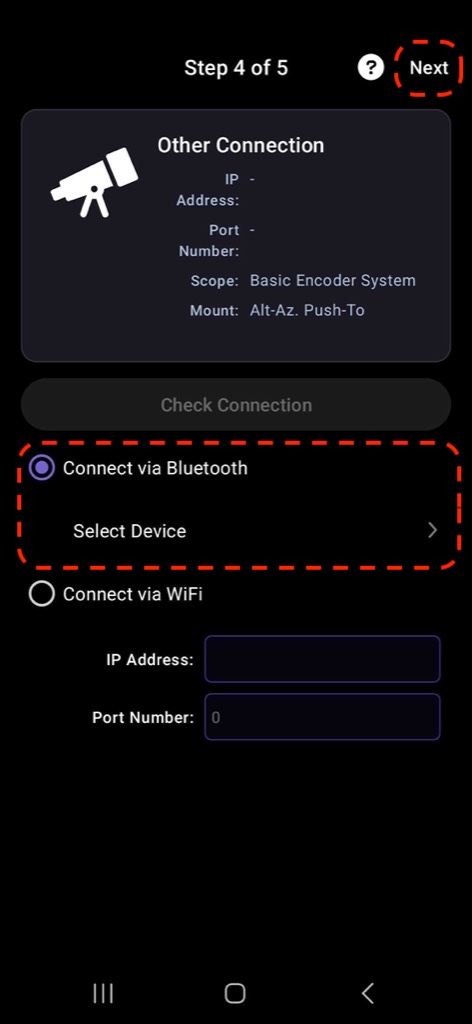
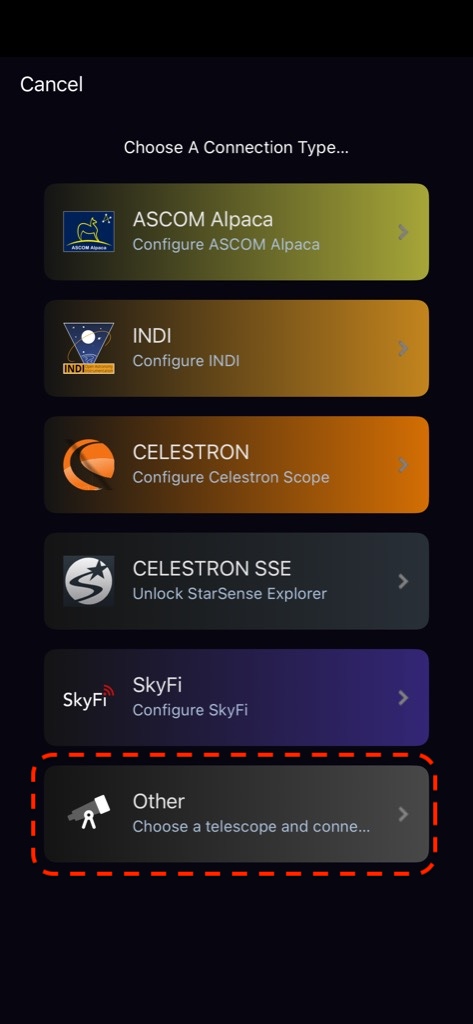
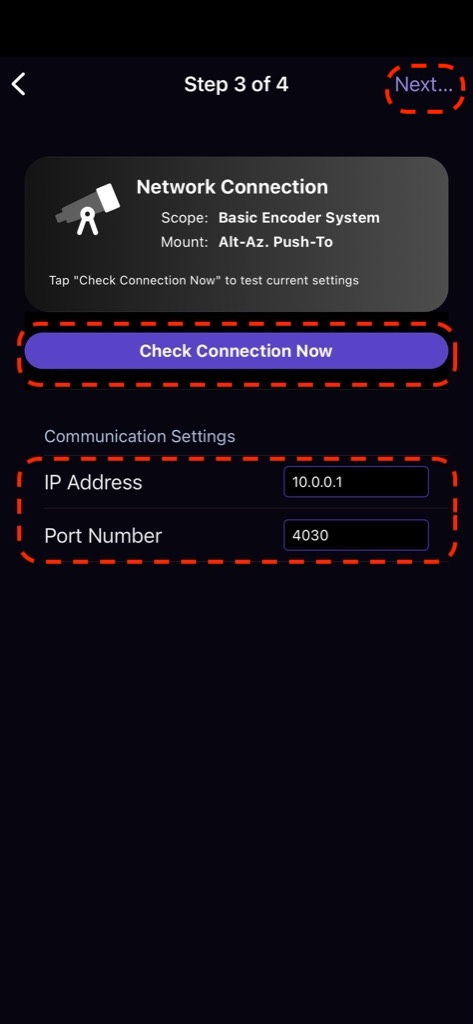
- Connection Method:
- Wi-Fi Connection:
- IP Address:
10.0.0.1 - Port Number:
4030
- IP Address:
- Bluetooth Connection: PushToAir_XXXX (Please refer to the image sequence below.)
- Wi-Fi Connection:
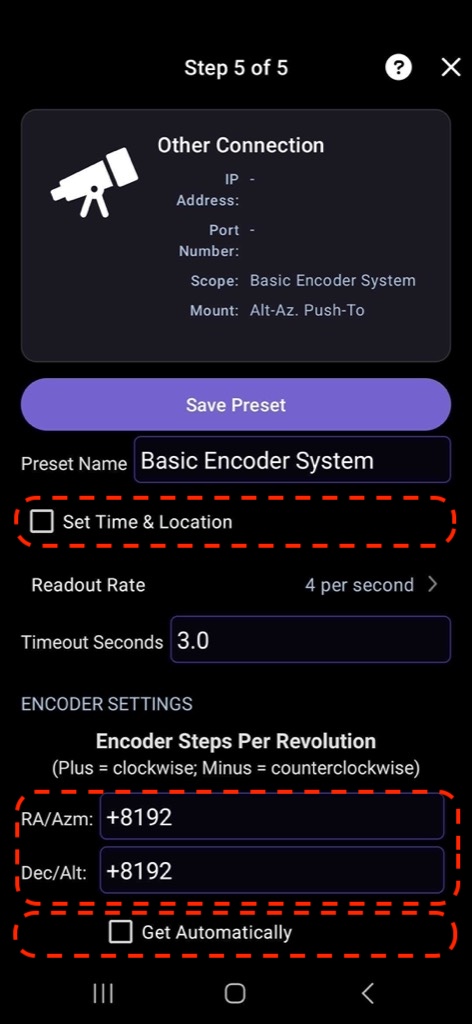
- Time & Location: Off
- RA/Azimuth (RA/Azm): +8192
- Dec/Altitude (Dec/Alt): +8192
- Get Automatically: Off
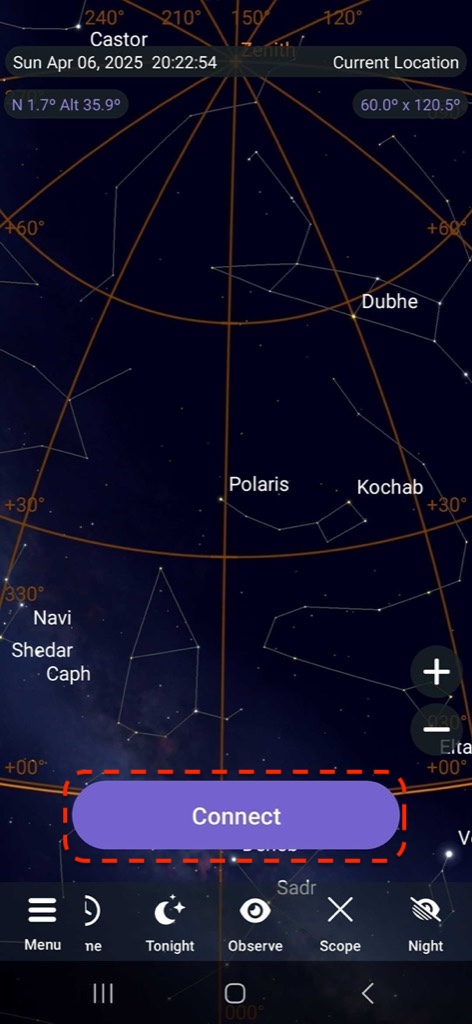
Connecting to the Telescope
Once a telescope preset is added and selected, you can proceed with the connection.
- Tap the “Telescope” tab in the bottom menu bar to connect.
- If the connection fails, verify Wi-Fi or Bluetooth connectivity.
- If disconnected, reconnect to the Push-To Air Wi-Fi network and retry connecting via SkySafari.
After a successful connection, moving the telescope will update the telescope’s position in SkySafari.
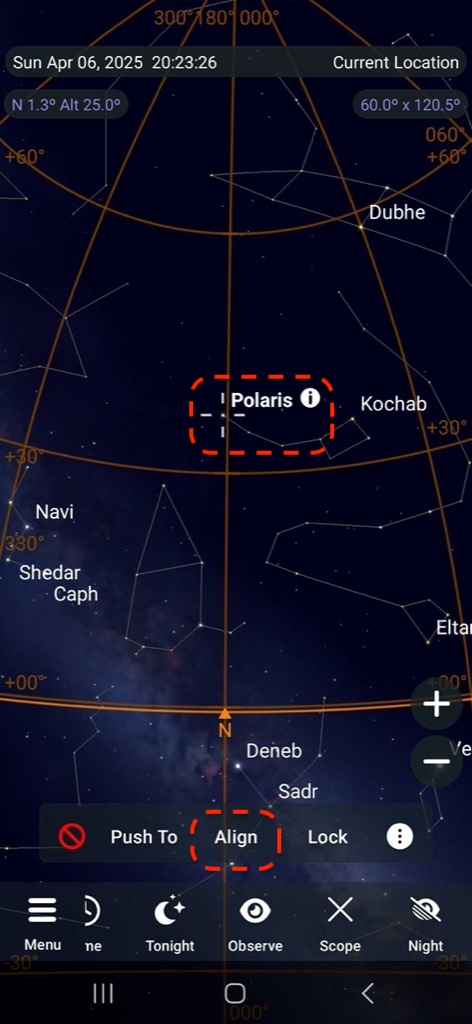
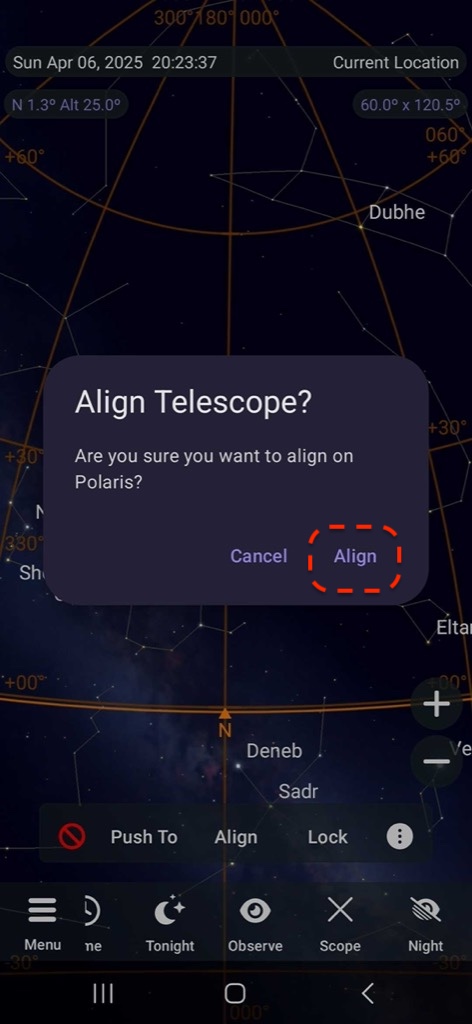
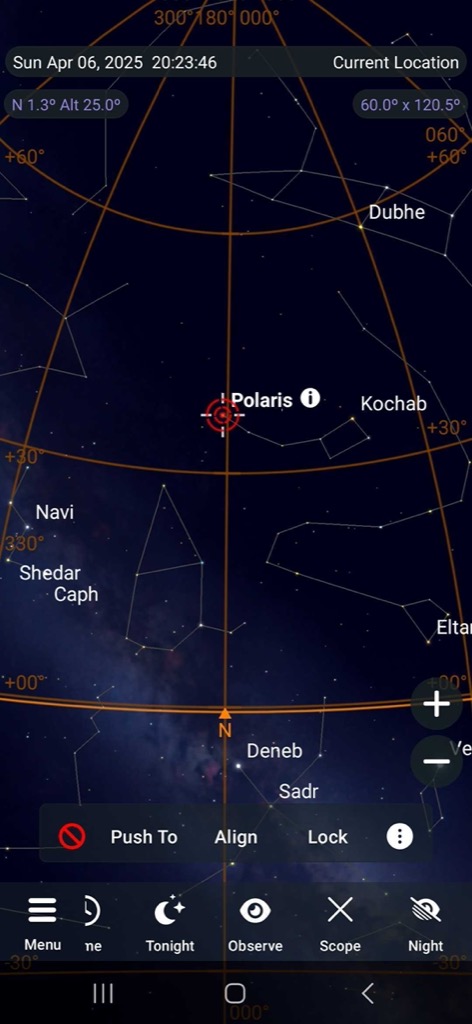
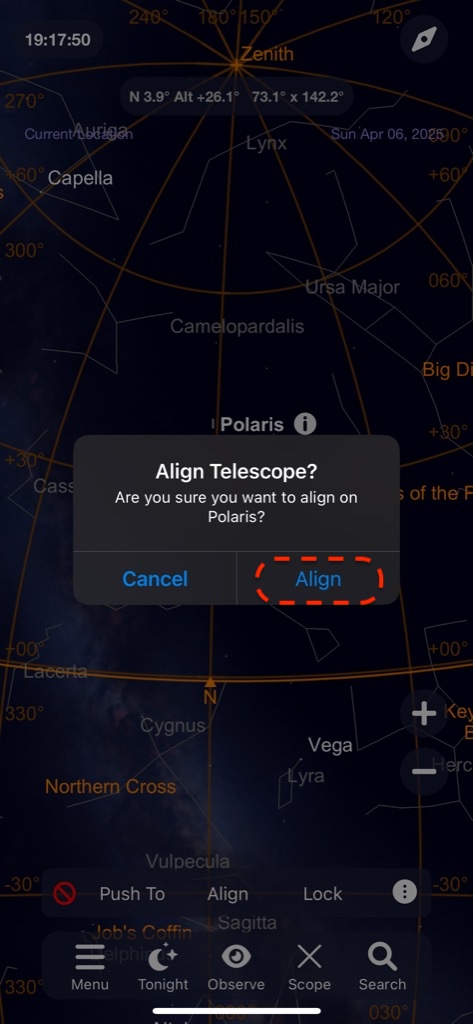
Now, you need to align the telescope by syncing its actual position with SkySafari’s displayed position.
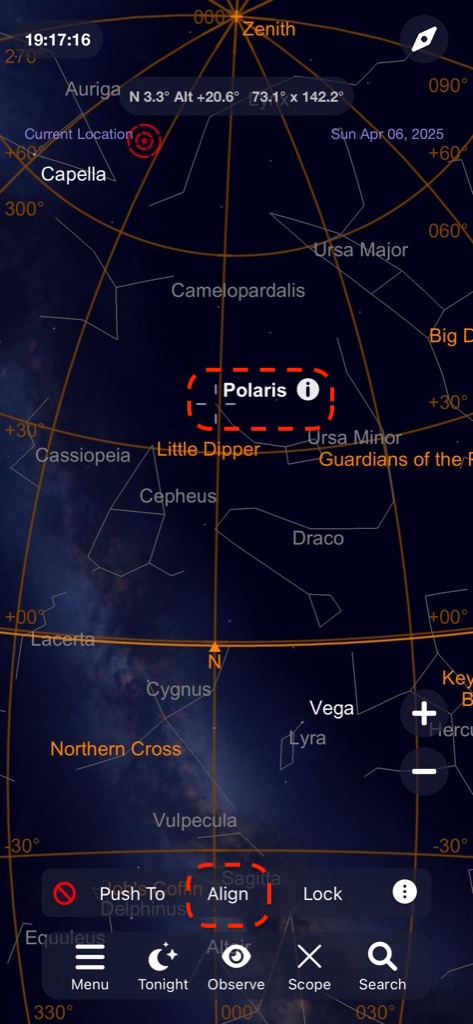
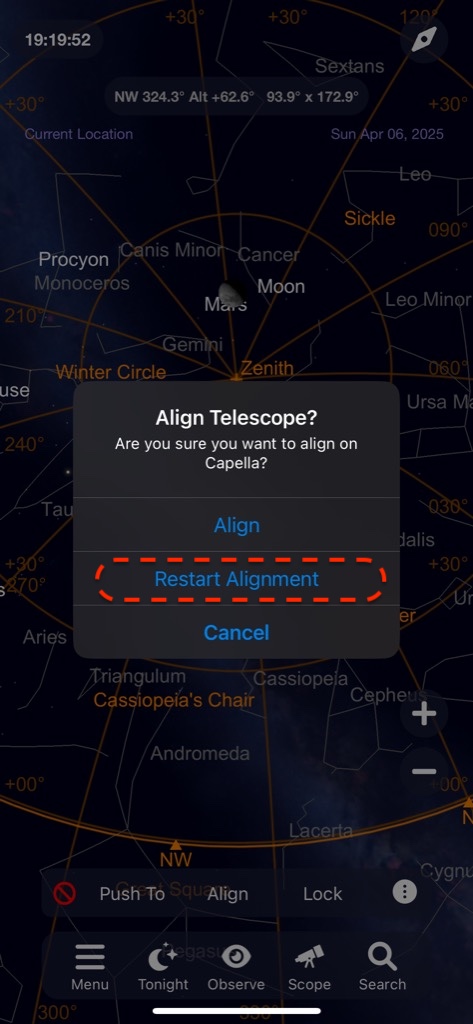
Alignment: “Align” vs. “Restart Alignment”
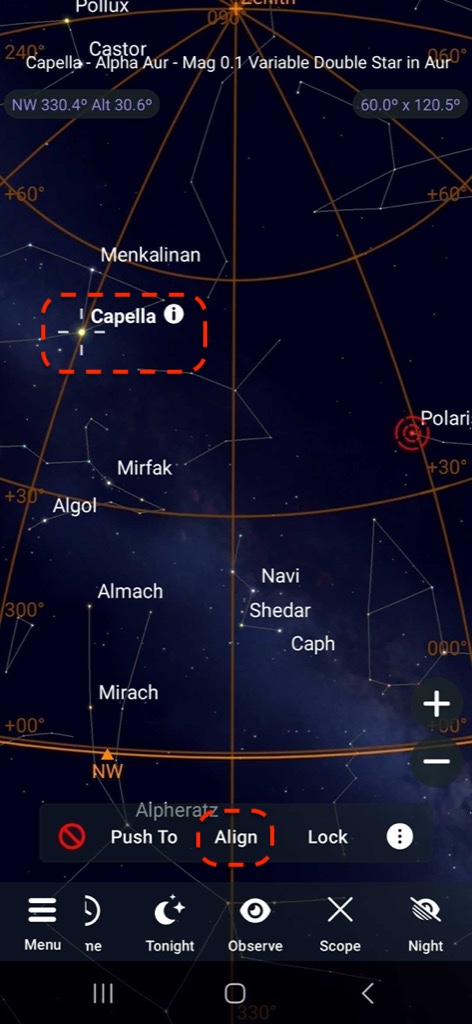
- Align: Used for initial one-star alignment or for two-star and three-star alignment.
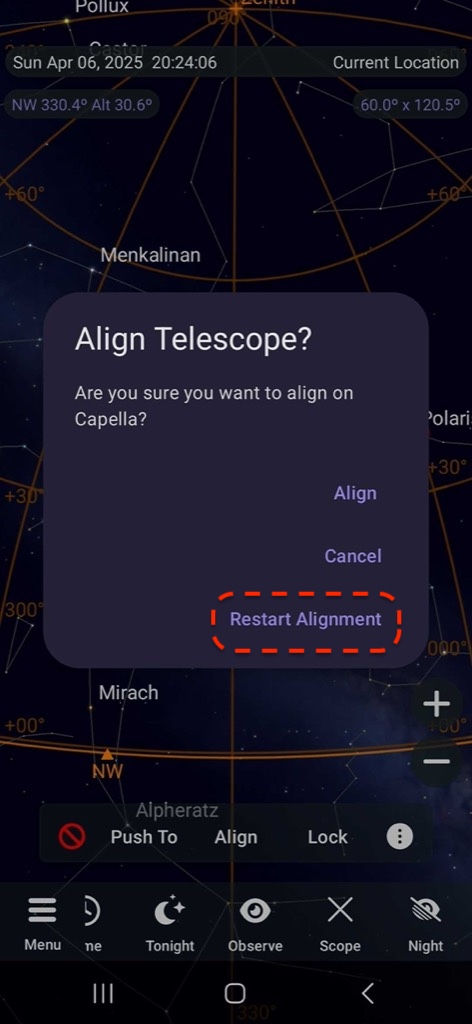
- Restart Alignment(Recommended): Ignores the previous alignment and starts a new first alignment.
Push-To Air Celestial Navigation Strategy
The sensor has an accuracy of approximately 1 degree, and errors can accumulate when the telescope is moved over long distances.
To reduce these errors, perform a Restart Alignment (one-star alignment) using a bright star near the object you want to observe.
This minimizes the sensor’s travel distance and improves overall accuracy.
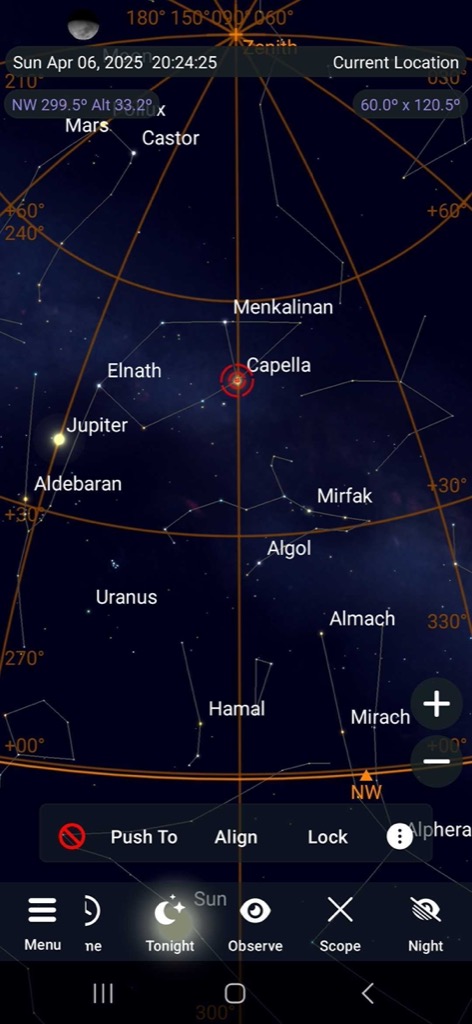
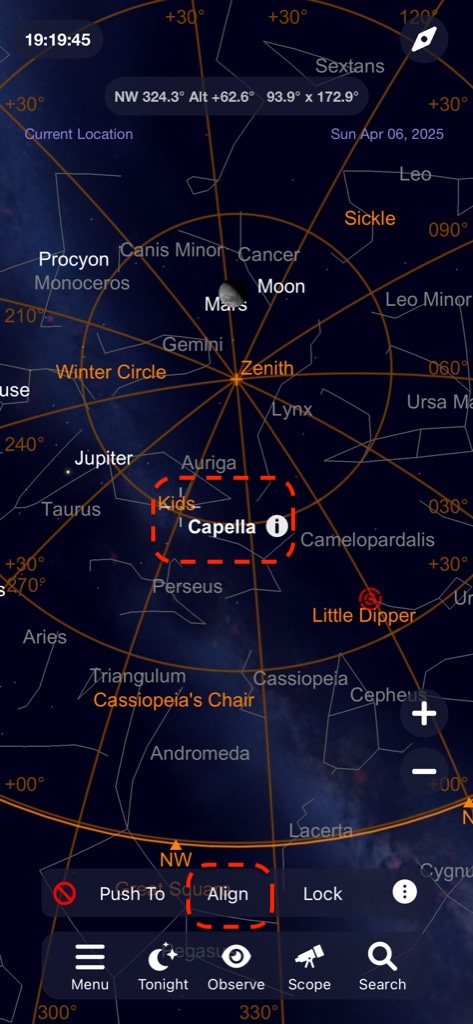
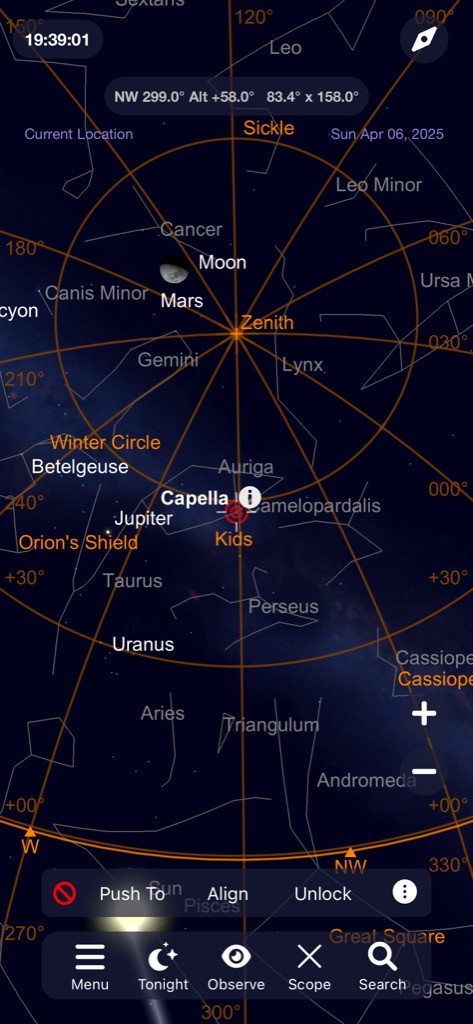
If you move to a different constellation or a distant part of the sky, it is recommended to perform another Restart Alignment using a bright star in that region. By following this method, you can accurately locate celestial objects even at high magnification.
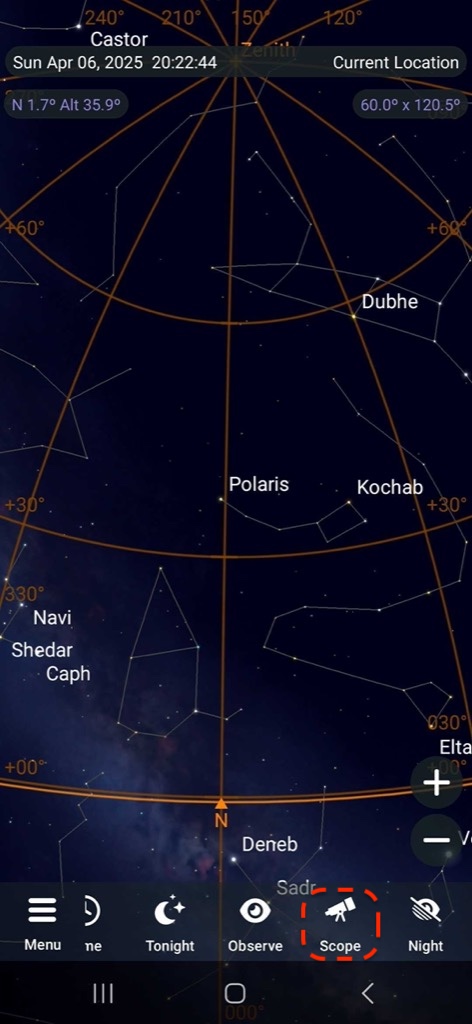
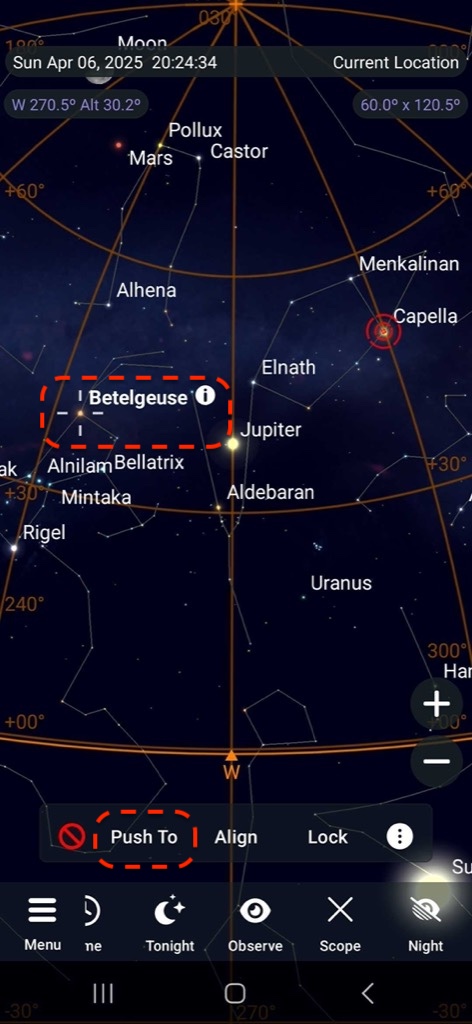
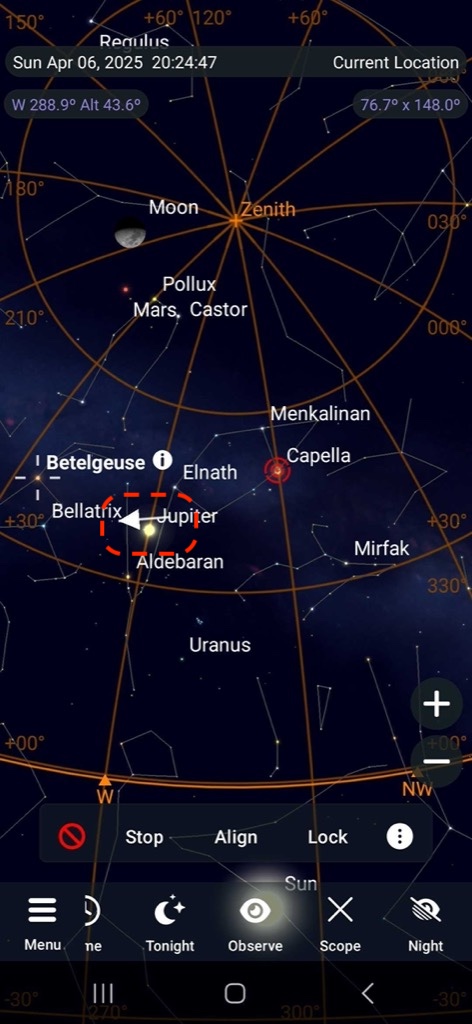
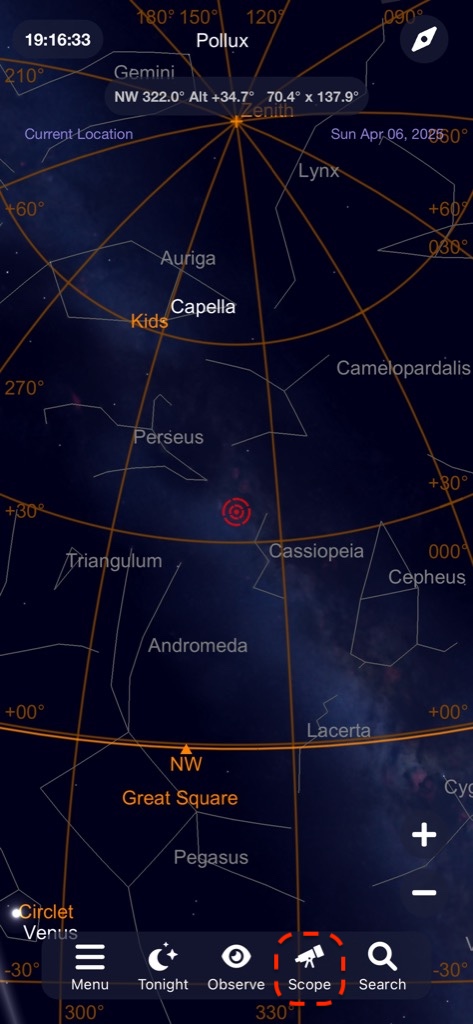
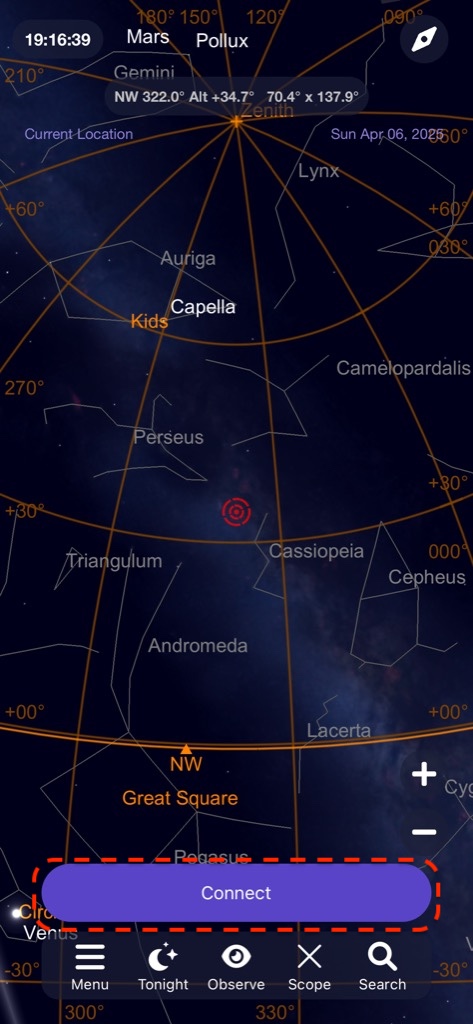
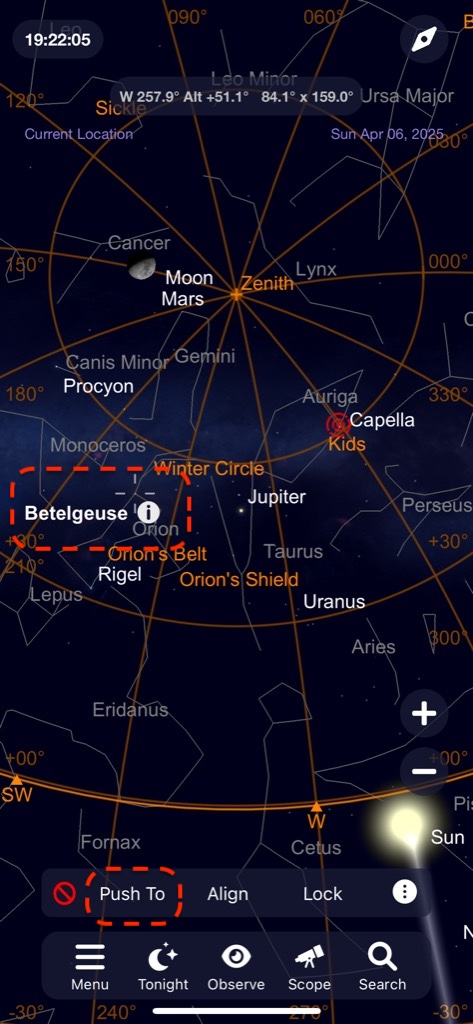
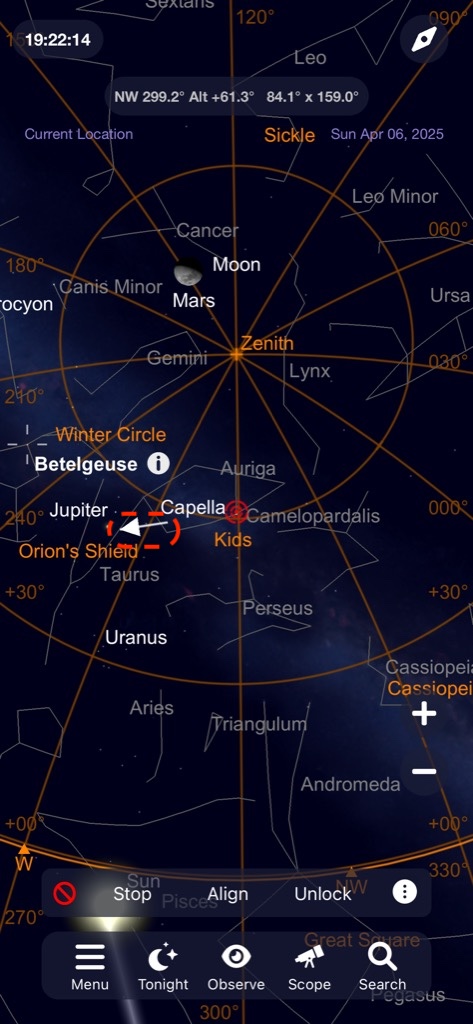
After selecting the object you want to observe, press the “Push To” button.
SkySafari will guide you with directional arrows showing where to move the telescope.
If the arrows disappear, simply press the “Push To” button again to bring them back.
SkySafari Bluetooth Setup on Android (With Images)


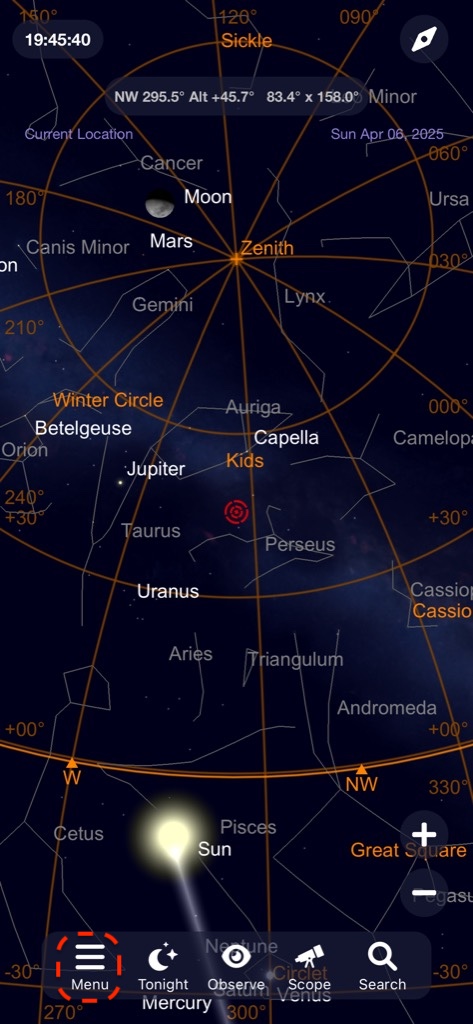
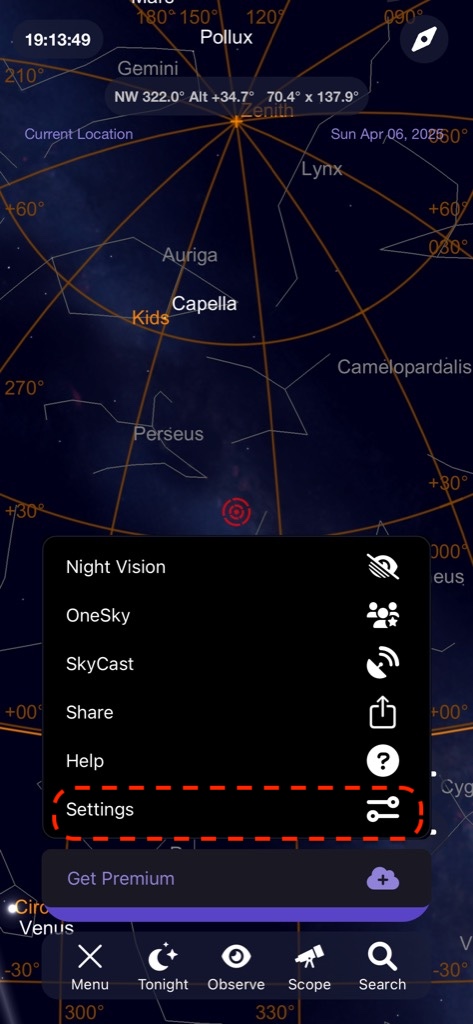
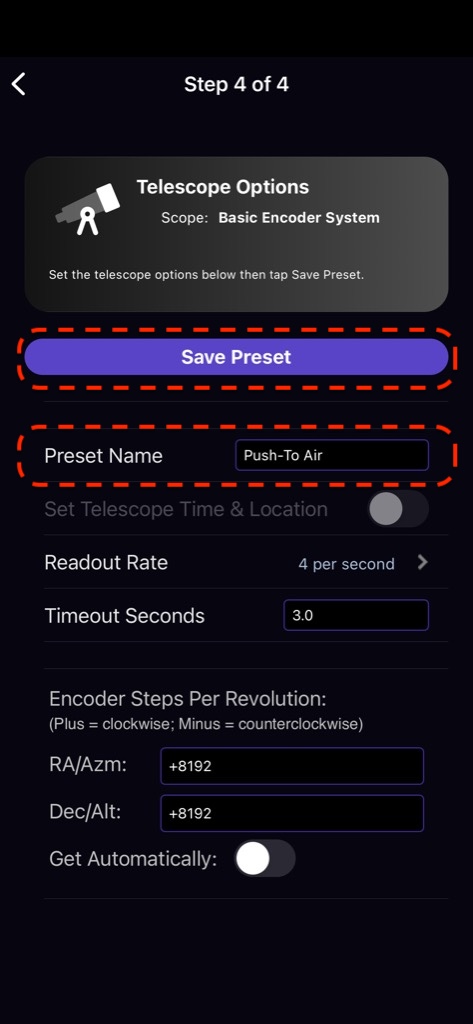
SkySafari Wi-Fi Setup on iOS (With Images)
SSID: PushToAir_XXXX, Password: pushtoair
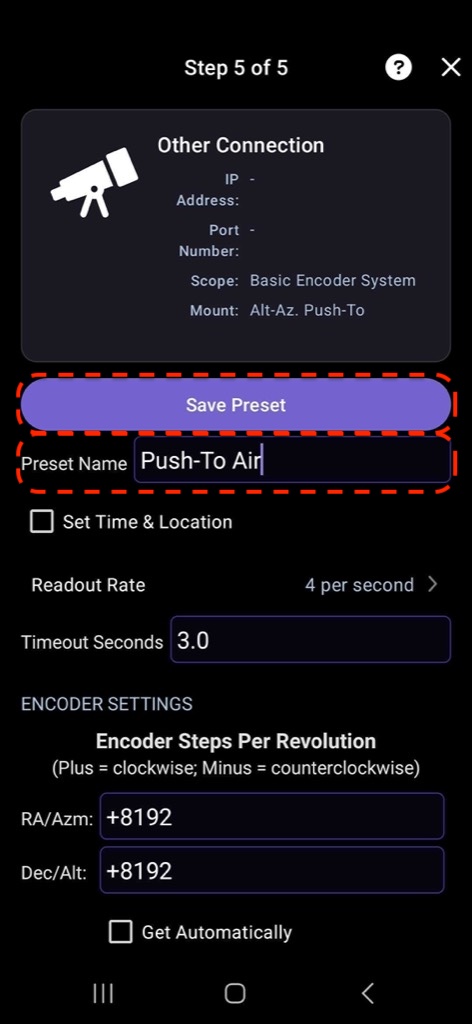
Set Encoder Steps to +8192, turn off "Get Automatically", and then save the preset.


Firmware Update
How to Update Firmware
- Connect to PTA (PushToAir_XXXX) Wi-Fi from a PC or macOS device.
- AP Name: PushToAir_XXXX
- Password: pushtoair
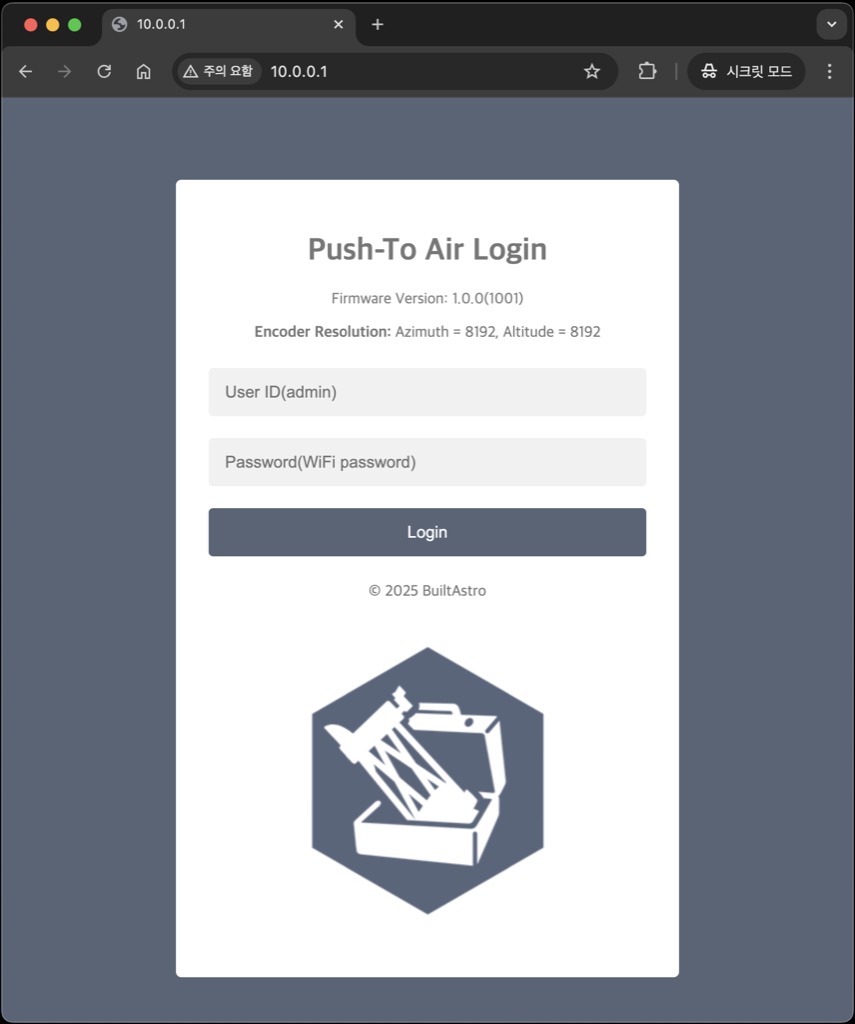
- Open a web browser and enter the following URL:
- Address:
10.0.0.1
- Address:
- Log in:
- User ID: admin
- Password: pushtoair
- (Same as the Wi-Fi connection password)
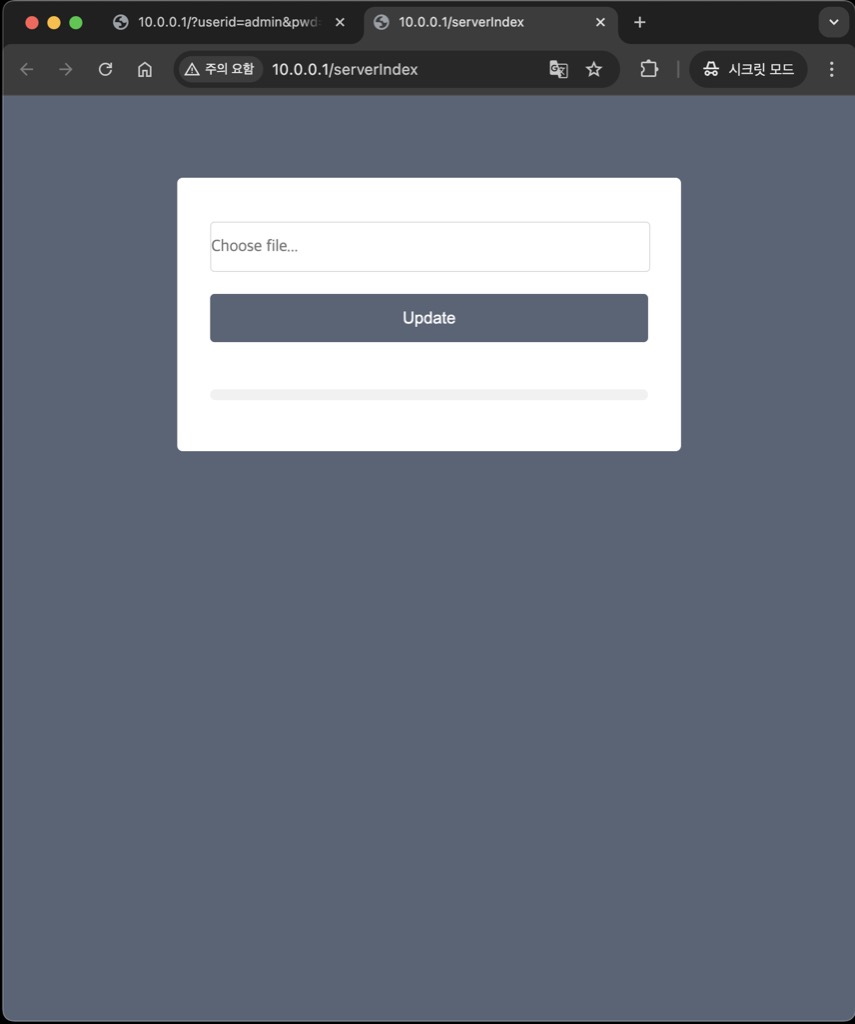
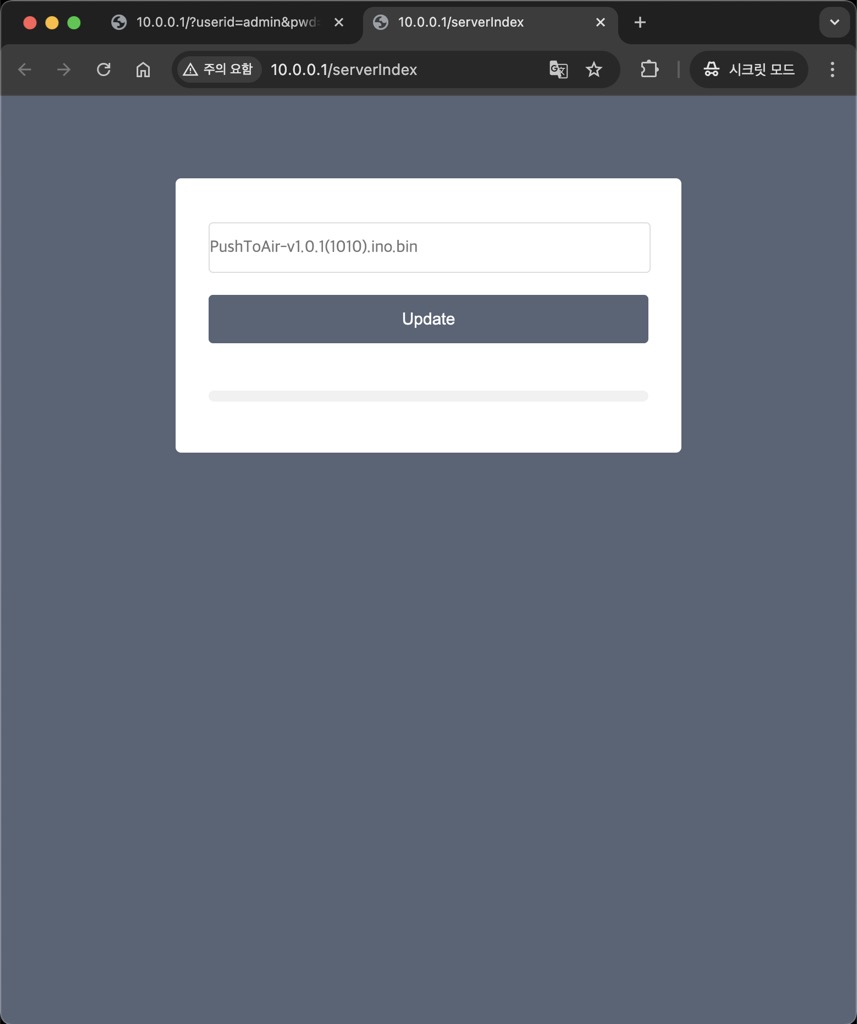
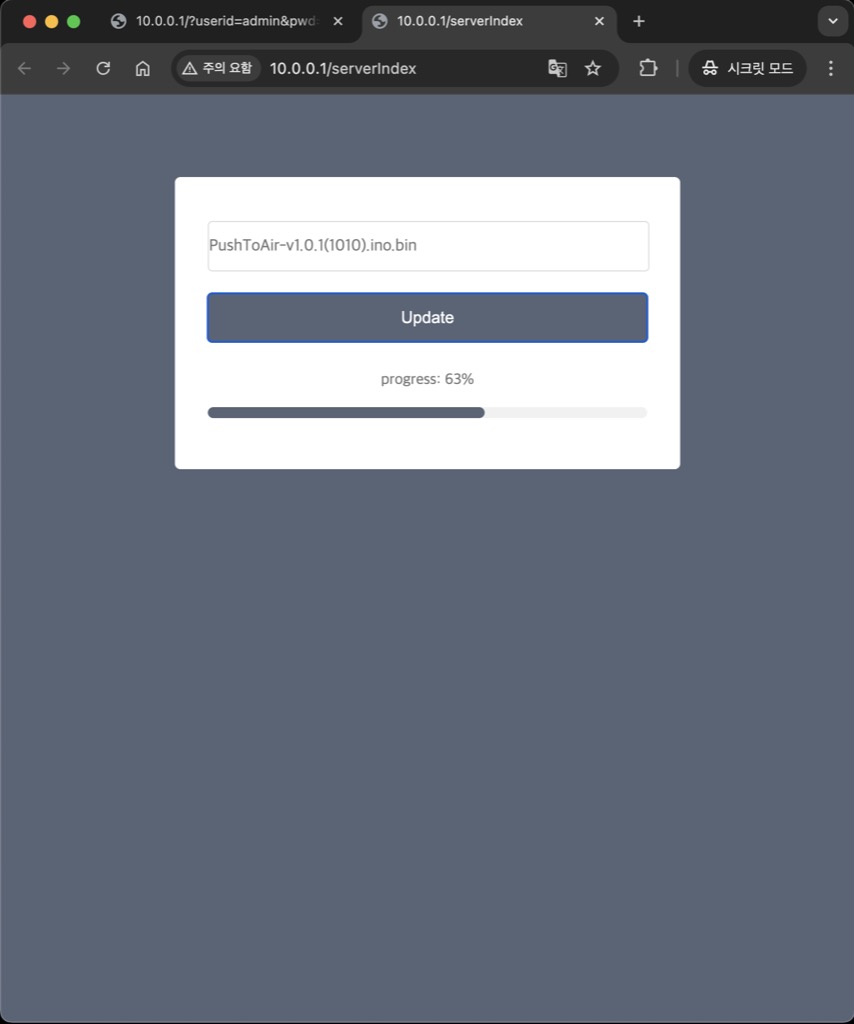
- Select the firmware file to update and proceed with the update.
- Verify the updated firmware version.
Download Latest Firmware
Firmware Update Steps (With Images)


Troubleshooting
- Ensure the device is fully charged before use. The CHARGE LED will turn OFF when charging is complete.
- If the connection is unstable or keeps disconnecting, try recharging the battery.
- If the STATUS LED is OFF, initialization has failed. Turn the power OFF and ON again.
- If the STATUS LED is ON but Push-To Air does not appear in the Wi-Fi network list, the battery may be low. Recharge the battery and try again. A low battery can weaken the Wi-Fi signal and cause frequent disconnections.
- Push-To Air can only connect to one device via Bluetooth or Wi-Fi at a time. If you are unable to connect a second device, disconnect the first device before attempting to reconnect.
- The built-in 18650 lithium-ion battery should only be charged between 0°C and 30°C (32°F–86°F).
- If the direction moves in reverse, please check in the SkySafari settings to ensure that the location is set to your current location.
When you want to change the direction of vertical (altitude) movement
The default bracket is designed to be mounted from top to bottom onto the dovetail base. However, if your telescope’s structure makes it difficult to mount from top to bottom and you prefer to mount it from bottom to top, you can choose one of the following two methods:
-
Change the Dec/Alt preset value In the preset settings, set the Dec/Altitude (Dec/Alt) value to –8192 instead of +8192. This is the easiest method.
-
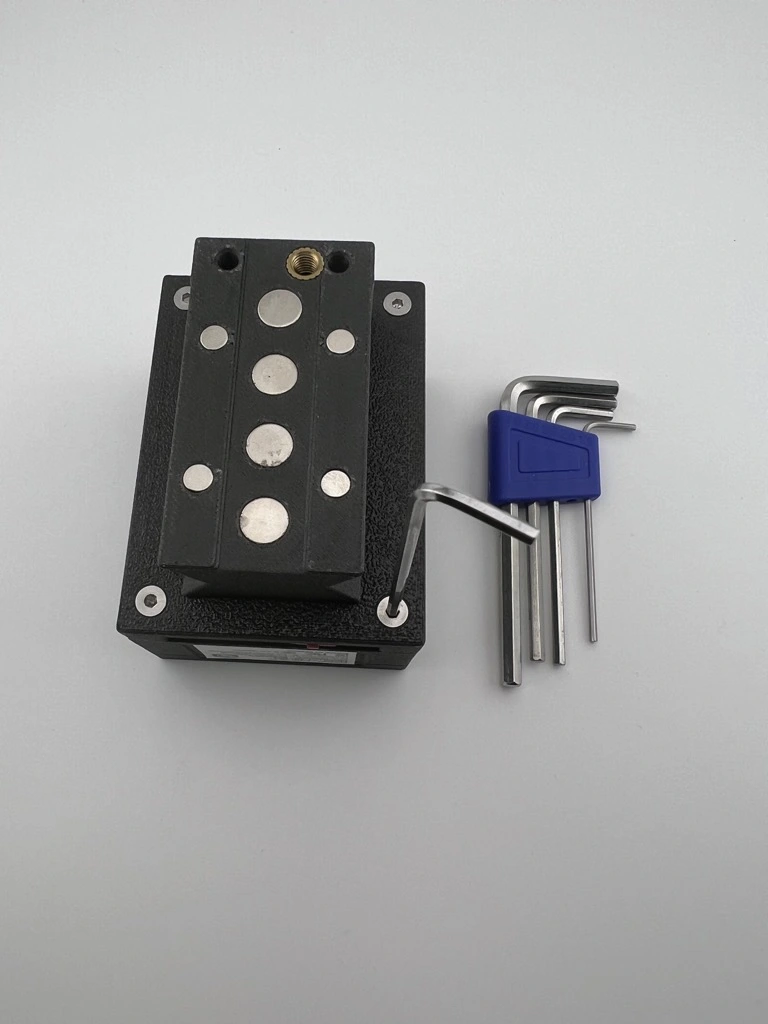
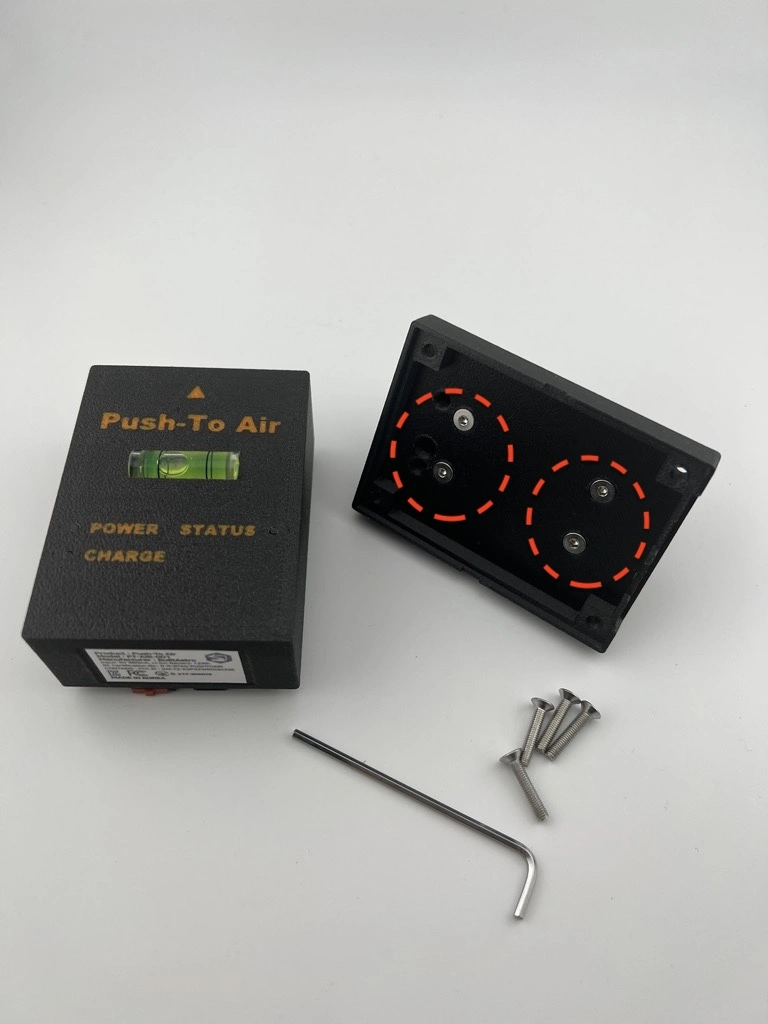
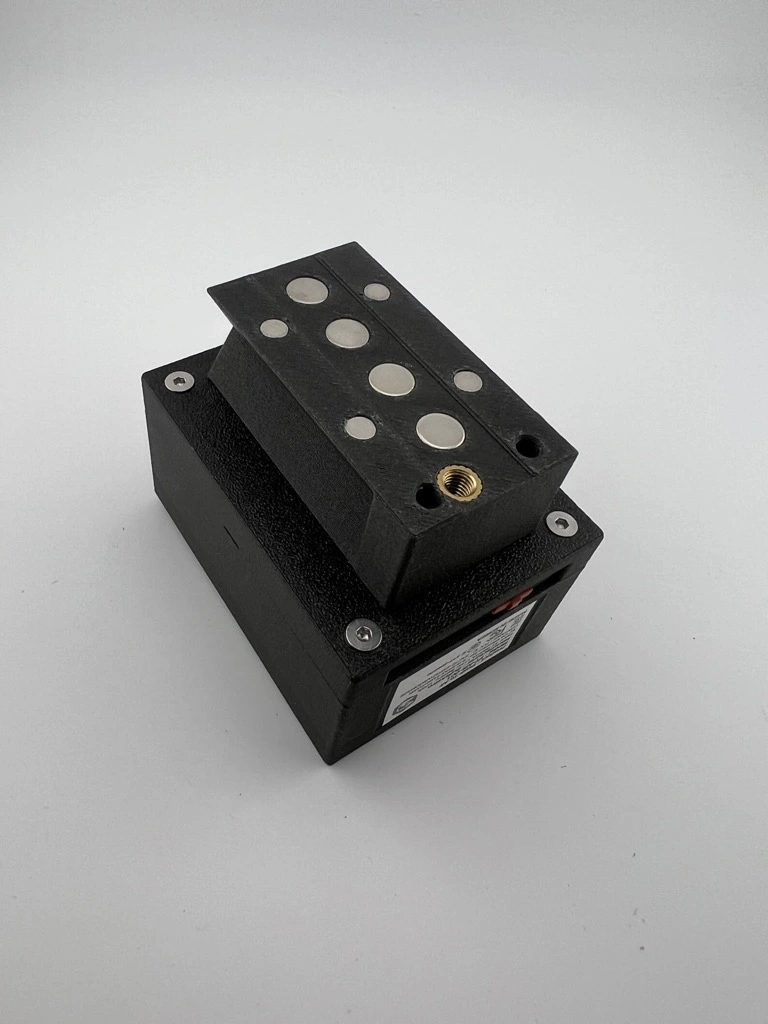
Reverse the bracket orientation Use a 2mm hex wrench to reverse the bracket as shown in the picture below.
Warranty & Technical Support
- 1-year free warranty (excluding user-caused damage).
- Accessories are not covered under warranty.
- Defective units within 7 days of purchase will be replaced with a new unit.
- Due to the nature of electronic products, refunds are not available after use.
- Warranty Claims(A/S): [email protected]
- Technical Support:
- E-Mail: [email protected]
- Website: https://www.pushtoair.com, https://www.builtastro.com
Certifications
Product Information
- Product Name: Push-To Air
- Model Number: PT-AIR-001
Certification Status
- KC Certification: R-R-BTAS-PUSHTOAIR
- FCC Certification: CONTAINS FCC ID: 2AC7Z-ESP32WROOM32E
- Japan MIC Certification: 217-204070


Push-To Air Gallery
Where to Buy Push-To Air
Where can I find reviews of your products?
Our products are already well received in South Korea, with a large number of units sold through local astronomy communities and online marketplaces. We continue to receive high ratings and positive feedback from users. You can check customer reviews and product details on our Korean online store:
- Naver Smart Store: https://smartstore.naver.com/builtastro
- Amazon US: https://www.amazon.com/dp/B0F3TBR42M
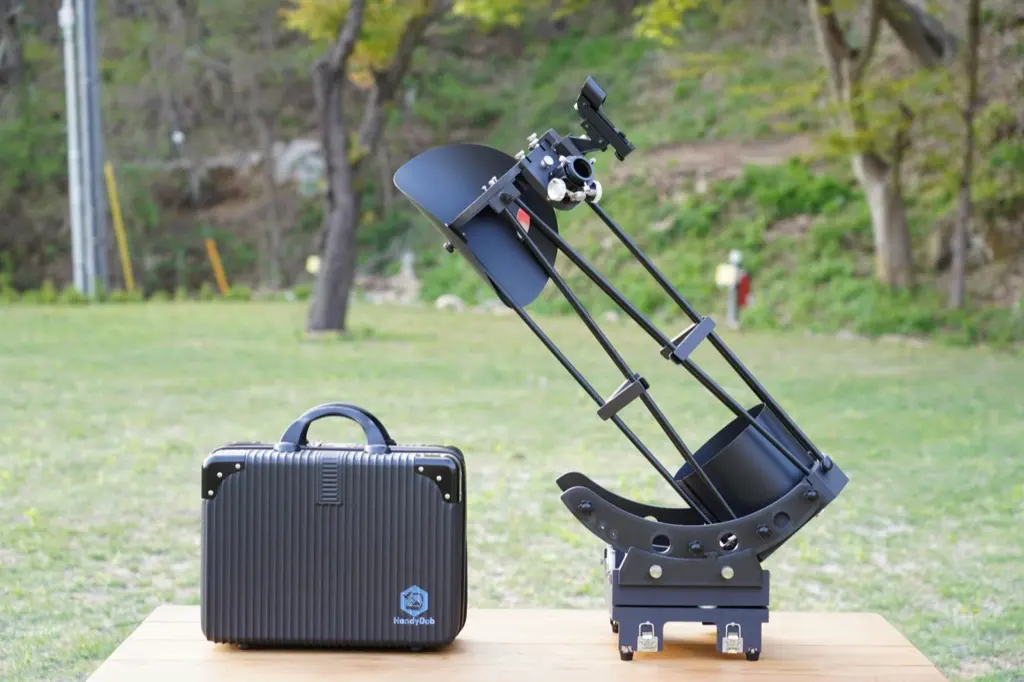
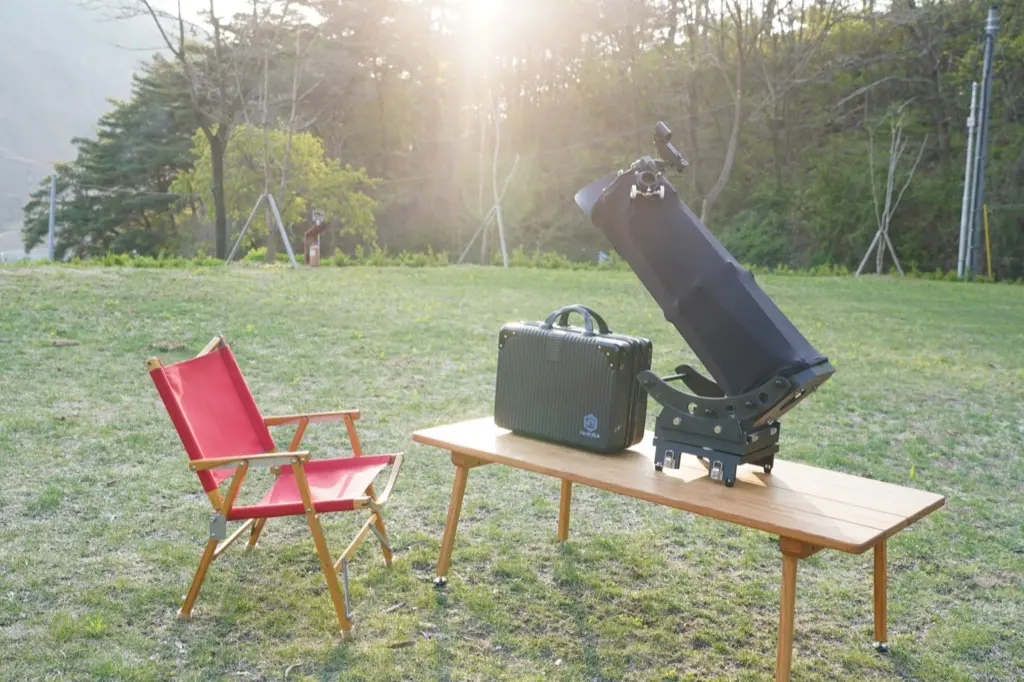
Have You Heard of the 6-Inch Travel Dobsonian HandyDob?